webpack搭建vue3项目
webpack官方文档:https://webpack.js.org/
webpack中文官方文档:https://webpack.docschina.org/
一. 搭建vue3项目初步
1.1 创建package.json文件
npm init -y
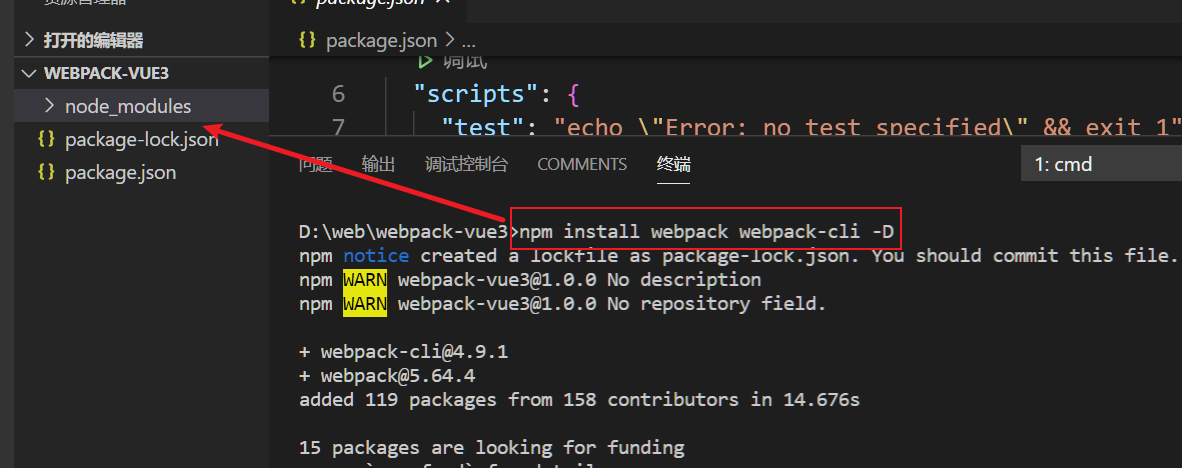
1.2 安装webpack
npm install webpack webpack-cli -D
1.3 webpack配置文件
新建xiu.config.js
const path = require("path");

module.exports = {
  entry: "./src/main.js",
  output: {
    filename: "bundle.js",
    path: path.resolve(__dirname, "./dist"),
  },
  mode: "development",
};
package.json中指定webpack配置文件
"serve": "webpack --config xiu.config.js",
执行npm run serve命令报错,因为没有./src/main.js
1.4 安装vue3
npm install vue@next1.4.1 新建src/main.js
因为现在没有引入vue模板编译器,所以只能用h函数展示数据。
import { createApp, h } from "vue";

const app = {
  data() {
    return {
      content: "helloworld",
    };
  },
  render() {
    return h("h1", null, this.content);
  },
};
createApp(app).mount("#app");
1.4.2 打包
npm run serve
生成了bundle文件。
1.4.3 新建public/index.html
引入打包后的文件
<!DOCTYPE html>
<html lang="en">
  <head>
    <meta charset="UTF-8" />
    <meta http-equiv="X-UA-Compatible" content="IE=edge" />
    <meta name="viewport" content="width=device-width, initial-scale=1.0" />
    <title>Document</title>
  </head>
  <body>
    <div id="app"></div>
    <script src="../dist/bundle.js"></script>
  </body>
</html>
浏览器打开index.html

二. 处理单文件组件
2.1 编写App.vue
<template>
  <h1>{{ content }}</h1>
</template>
<script>
import { defineComponent } from "vue";

export default defineComponent({
  setup() {
    return {
      content: "hello world2",
    };
  },
});
</script>
2.2 main.js中引入

执行npm run serve会报错,因为webpack默认不能处理.vue文件

2.3 让webpack支持.vue文件
2.3.1 安装loader和插件
npm install vue-loader -D

npm install @vue/compiler-sfc -D
2.3.2 配置loader和插件
将下面内容复制到原来的配置文件中:
const { VueLoaderPlugin } = require("vue-loader/dist/index");

module.exports = {
  module: {
    rules: [
      {
        test: /\.vue$/,
        loader: "vue-loader",
      },
    ],
  },
  plugins: [new VueLoaderPlugin()],
  resolve: {
    extensions: [".wasm", ".mjs", ".js", ".json", ".vue"],
  },
};
执行npm run serve刷新浏览器

三、webpack常用loader配置
3.1 ts-loader
3.1.1 安装
npm install typescript ts-loader -D3.1.2 配置
3.1.2.1 webpack配置文件
// entry修改为ts后缀
entry: "./src/main.ts",

{
   test: /\.ts$/,
   loader: "ts-loader",
   exclude: /node_modules/,
   options: {
      appendTsSuffixTo: [/\.vue$/],
   },
},
vue 单文件组件中假如使用了 lang="ts", ts-loader需要配置 appendTsSuffixTo: [/\.vue$/],用来给 .vue文件添加个 .ts后缀用于编译。
3.1.2.2 ts配置
- 生成ts配置文件
npx tsc --init
- 添加vue文件类型声明
作用是让ts认识.vue的后缀文件,并在导入vue文件后拿到里面声明的类型。

// shims-vue.d.ts

declare module "*.vue" {
  import type { DefineComponent } from "vue";
  const component: DefineComponent<{}, {}, any>;
  export default component;
}
3.1.3 测试
App.vue
<template>
  <div>
    <h1>{{ content }}</h1>
    <h1>{{ testRef }}</h1>
  </div>
</template>
<script lang="ts">
import { defineComponent, ref } from "vue";

export default defineComponent({
  setup() {
    const testRef = ref<string>();
    testRef.value = "hello world ts";
    return {
      testRef,
      content: "hello world2",
    };
  },
});
</script>
编译后刷新浏览器:


1
1
1
1
1
1
1
1
1
1