React组件化
目标
掌握组件化开发中多种实现技术
- 掌握高阶组件HOC。
- 了解组件化概念,能设计并实现自己需要的组件 。
- 掌握弹窗类实现,掌握传送门使用。
资源
create-react-app: https://www.html.cn/create-react-app/docs/getting-started/
HOC:https://reactjs.org/docs/higher-order-components.html
ant design:https://ant.design/docs/react/use-with-create-react-app-cn
组件化优点
- 增强代码重用性,提高开发效率
- 简化调试步骤,提升整个项目的可维护性
- 便于协同开发
- 注意点:降低耦合性
一、高阶组件-HOC
为了提高组件复用率,可测试性,就要保证组件功能单一性;但是若要满足复杂需求就要扩展功能单一的组件,在React里就有了 HOC(Higher-Order Components)的概念。
定义:高阶组件是参数为组件,返回值为新组件的函数。
基本使用
1、高阶组件定义
// hoc: 是一个函数,接收一个组件,返回另外一个组件
// 这里大写开头的Cmp是指function或者class组件
const foo = (Cmp) => (props) => {
  return (
    <div className="border">
      <Cmp {...props} />
    </div>
  );
};
2、定义组件,把该组件传递给高阶组件
function Child(props) {
  return <div> Child {props.name}</div>;
}

const Foo = foo(Child);
3、使用Foo
export default class HocPage extends Component {
  render() {
    return (
      <div>
        <h3>HocPage</h3>
        <Foo name="msg" />
      </div>
    );
  }
}
链式调用
// 高阶组件foo
const foo = (Cmp) => (props) => {
  return (
    <div className="border">
      <Cmp {...props} />
    </div>
  );
};

// 高阶组件foo2
const foo2 = (Cmp) => (props) => {
  return (
    <div className="greenBorder">
      <Cmp {...props} />
    </div>
  );
};

// 传给高阶组件的普通函数组件
function Child(props) {
  return <div> Child {props.name}</div>;
}

// 链式调用
const Foo = foo2(foo(foo(Child)));

// 显示
export default class HocPage extends Component {
  render() {
    return (
      <div>
        <h3>HocPage</h3>
        <Foo name="msg" />
      </div>
    );
  }
}
装饰器写法
高阶组件本身是对装饰器模式的应用,自然可以利用ES7中出现的装饰器语法来更优雅的书写代码。
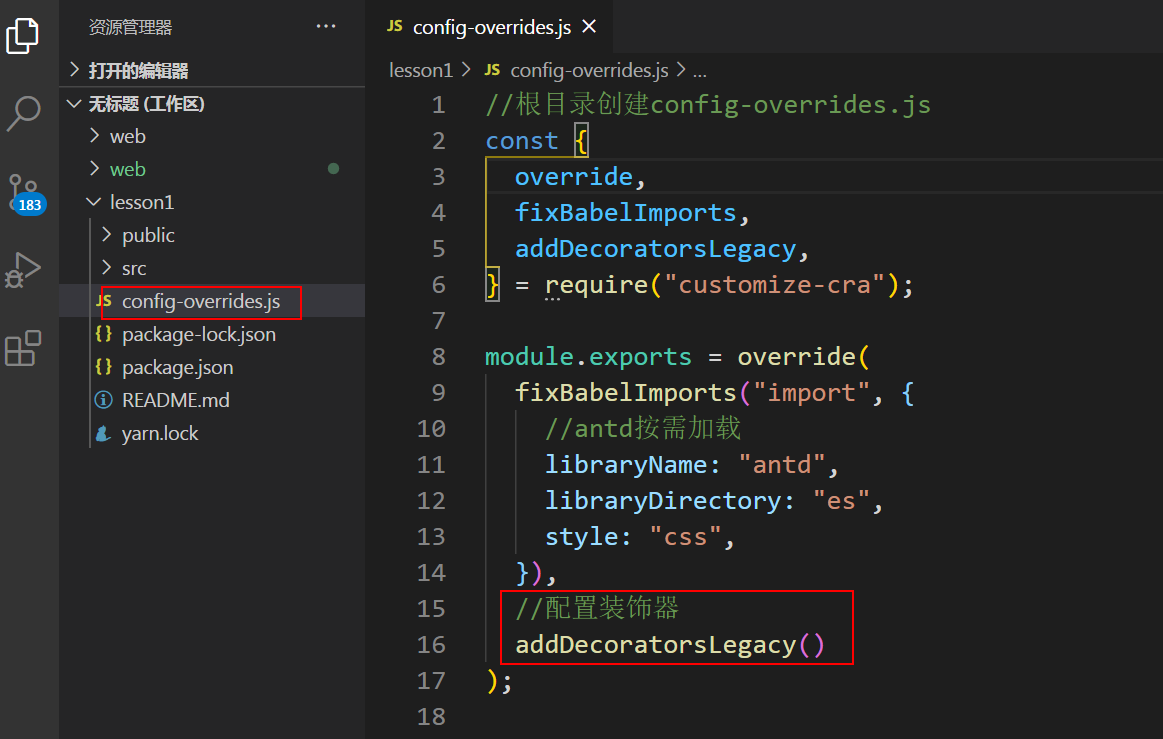
npm install -D @babel/plugin-proposal-decorators更新config-overrides.js
//配置完成后记得重启下
const { addDecoratorsLegacy } = require("customizecra");
module.exports = override(
 ...,
 addDecoratorsLegacy()//配置装饰器
);
如果vscode对装饰器有warning,vscode设置加上
javascript.implicitProjectConfig.experimentalDecorator
s": true
装饰器使用
//HocPage.js
//...
// !装饰器只能用在class上
// 执行顺序从下往上
@foo2
@foo
@foo
class Child extends Component {
  render() {
    return <div> Child {this.props.name}</div>;
  }
}

// const Foo = foo2(foo(foo(Child)));
export default class HocPage extends Component {
  render() {
    return (
      <div>
        <h3>HocPage</h3>
        {/* <Foo name="msg" /> */}
        <Child />
      </div>
    );
  }
}
组件是将 props 转换为 UI,而高阶组件是将组件转换为另一个组件。
HOC 在 React 的第三方库中很常见,例如 React-Redux 的 connect。
使用HOC的注意事项
高阶组件(HOC)是 React 中用于复用组件逻辑的一种高级技巧。 HOC 本身不是 React API 的一部分,它是一种基于 React 的组合特性而形成的设计模式。
注意: 不要在 render 方法中使用HOC
React 的 diff 算法(称为协调)使用组件标识来确定它是应该更新现有子树还是将其丢弃并挂载新子树。如果从 render 返回的组件与前一个渲染中的组件相同(===),则 React 通过将子树与新子树进行区分来递归更新子树。 如果它们不相等,则完全卸载前一个子树。
render() {
  // 每次调用 render 函数都会创建一个新的EnhancedComponent
  // EnhancedComponent1 !== EnhancedComponent2
  const EnhancedComponent = enhance(MyComponent);
  // 这将导致子树每次渲染都会进行卸载,和重新挂载的操作!
  return <EnhancedComponent />;
}
这不仅仅是性能问题 - 重新挂载组件会导致该组件及其所有子组件的状态丢失。
二、表单组件设计
表单组件设计思路
- 表单组件要求实现数据收集、校验、提交等特性,可通过高阶组件扩展
- 高阶组件给表单组件传递一个input组件包装函数接管其输入事件并统一管理表单数据
- 高阶组件给表单组件传递一个校验函数使其具备数据校验功能
表单组件实现
表单基本结构
创建MyFormPage.js
import React, {Component} from "react";
import kFormCreate from "../components/kFormCreate";

const nameRules = {required: true, message: "please input ur name"};
const passwordRules = {required: true, message: "please input ur password"};

@kFormCreate
class MyFormPage extends Component {
  submit = () => {
    const {getFieldsValue, getFieldValue, validateFields} = this.props;
    validateFields((err, values) => {
      if (err) {
        console.log("err", err); //sy-log
      } else {
        console.log("success", values); //sy-log
      }
    });
    console.log("submit", getFieldsValue(), getFieldValue("password"));
  };
  render() {
    console.log("props", this.props); //sy-log
    const {getFieldDecorator} = this.props;
    return (
      <div>
        <h3>MyFormPage</h3>
        {getFieldDecorator("name", {rules: [nameRules]})(
          <input type="text" placeholder="please input ur name" />
        )}
        {getFieldDecorator("password", {rules: [passwordRules]})(
          <input type="password" placeholder="please input ur password" />
        )}
        <button onClick={this.submit}>提交</button>
      </div>
    );
  }
}

export default MyFormPage;
高阶组件kFormCreate
扩展现有表单,./components/kFormCreate.js
import React, { Component } from "react";

export default function kFormCreate(Cmp) {
  return class extends Component {
    constructor(props) {
      super(props);
      this.state = { errors: {} };
      this.options = {};
    }

    // 输入框输入事件处理
    handleChange = (e) => {
      // setState name value
      let { name, value } = e.target;

      this.validate({
        ...this.state,
        [name]: value,
      });
      // this.setState({[name]: value}, () => {
      //   this.validate();
      // });
    };

    // 给表单项包装
    getFieldDecorator = (field, option) => {
      // options: { name: {rules: [{required: true, message: "please input ur name"}]} }
      this.options[field] = option;
      return (InputCmp) => {
        // 克隆一份
        return (
          <div>
            {React.cloneElement(InputCmp, {
              name: field,
              value: this.state[field] || "",
              onChange: this.handleChange,
            })}
            <p className="red">{this.state.errors[field]}</p>
          </div>
        );
      };
    };

    // 获取全部表单输入值
    getFieldsValue = () => {
      return { ...this.state };
    };

    // 根据表单name获取值
    getFieldValue = (field) => {
      return this.state[field];
    };

    // 表单校验
    validate = (state) => {
      const errors = {};
      // const state = {...this.state};
      for (let name in this.options) {
        if (state[name] === undefined) {
          // 没有输入,判断为不合法
          errors[name] = this.options[name].rules[0].message; //"error";
        }
      }
      this.setState({ ...state, errors });
    };

    // 表单提交调用,被包装的组件通过this.props.validateFields调用
    validateFields = (callback) => {
      // 校验错误信息
      // const errors = {};
      const state = { ...this.state };
      // for (let name in this.options) {
      //   if (state[name] === undefined) {
      //     // 没有输入,判断为不合法
      //     errors[name] = this.options[name].rules[0].message; //"error";
      //   }
      // }
      // this.setState({errors});
      this.validate(state);
      const { errors } = this.state;
      if (JSON.stringify(errors) === "{}") {
        // 合法
        callback(undefined, state);
      } else {
        callback(errors, state);
      }
    };

    render() {
      return (
        <div className="border">
          <Cmp
            getFieldDecorator={this.getFieldDecorator}
            getFieldsValue={this.getFieldsValue}
            getFieldValue={this.getFieldValue}
            validateFields={this.validateFields}
          />
        </div>
      );
    }
  };
}
二、弹窗类组件设计与实现
设计思路
弹窗类组件的要求弹窗内容在A处声明,却在B处展示。react中相当于弹窗内容看起来被render到一个组件里面去,实际改变的是网页上另一处的DOM结构,这个显然不符合正常逻辑。但是通过使用框架提供的特定API创建组件实例并指定挂载目标仍可完成任务。
具体实现: Portal
传送门,react v16之后出现的portal可以实现内容传送功能。
范例:Dialog组件
import React, {Component} from "react";
import {createPortal} from "react-dom";

export default class Dialog extends Component {
  constructor(props) {
    super(props);
    // 创建div并追加到body下
    const doc = window.document;
    this.node = doc.createElement("div");
    doc.body.appendChild(this.node);
  }

  componentWillUnmount() {
    // 组件销毁前移除div
    window.document.body.removeChild(this.node);
  }

  render() {
    // 将类名为dialog的元素渲染到之前construct里创建的div
    return createPortal(
      <div className="dialog">
        <h3>Dialog</h3>
        {this.props.children}
      </div>,
      this.node
    );
  }
}
.dialog {
position: absolute;
top: 0;
right: 0;
bottom: 0;
left: 0;
line-height: 30px;
width: 400px;
height: 300px;
transform: translate(50%, 50%);
border: solid 1px gray;
text-align: center;
}总结:
- Dialog什么都不给自己画,render返回个null就够了;
- 它做得事情是通过调用createPortal把要画的东西画在DOM树上另一个⻆落。

1
1
1
1
1
1
1
1
1
1